
Base curve, a hybrid module
The Base curve module lets you adjust the contrast and dynamic range of an image by applying a transfer curve to the luminance values. Based on darktable’s historical module, it now offers two distinct approaches: a classic, display-oriented mode (Legacy) and an advanced scene-referred extension.
The pipeline
- Base curve (node-based LUT), applied to the RGB channels, common to all modes
- Blend of the chosen Color look (3×3 matrix), active in every mode, including Legacy
- In Legacy mode: processing essentially stops here (optionally combined with the Preserve colors method), no further tone mapping
- In scene mode (kinematic / dynamic): Highlight gain (linear gain) and Shadow correction (gamma) applied to the three channels, before tone mapping
- In scene mode (kinematic / dynamic): conversion to XYZ then JzAzBz, adaptive scale factor based on the perceptual luminance Jz, ACES tone mapping (1.0 in kinematic, 2.0 in dynamic) on the luminance, then a proportional gain reapplied to the three channels to preserve the original hue
- In Cinematic DRT: RGB → Oklab conversion; saturation adjustment (Saturation boost + Balance saturation); soft chroma compression (this mode’s internal gamut protection); calculation of an OpenDRT-style vector norm; Contrast (brilliance), Highlight gain and Shadow correction applied to that norm; ACES 2.0 tone mapping on the norm; highlight hue/saturation correction; Oklab → RGB reconstruction; detail blend (75% processed / 25% original); progressive desaturation toward white above 85% brightness
- Highlight roll-off: progressive desaturation toward neutral (toward white in Cinematic DRT) above 80% brightness, common to all three scene modes
- Saturation balance/boost in JzAzBz space, global gamut compression (Compression smoothness), and highlight hue/saturation correction, recalculated here a second time in JzAzBz; in Cinematic DRT, only the hue/sat part applies at this stage, on top of its own internal processing already done in Oklab
- Per-hue gamut compression (cyan/magenta/yellow thresholds and limits), then Purity boost
The curve graph
Four buttons above the graph:
- Camera icon: automatically computes a 5-node curve from the embedded JPEG thumbnail in the RAW file, useful in Legacy mode to start from a render close to the camera’s own output.
- Brush/styles icon: computes a curve variant optimized for bright or high-key scenes.
- Eyedropper: samples the luminance of a point in the image and shows it on the graph, without adding a node, to see where a specific area of the photo falls on the current curve.
- Eye: shows or hides the two numeric position sliders for the selected node (X/Y), below the graph, for precise keyboard-based fine-tuning instead of the mouse.
On the graph itself:
- Ctrl + click on an empty area: adds a new node at that point.
- Click and drag on a node: moves it.
- Scroll wheel on a selected node: fine-tunes its vertical position.
- Arrow keys, with a node selected: moves the node step by step (X/Y); a modifier (Shift/Ctrl, depending on your shortcut configuration) changes the step size.
- Right-click on a selected node: deletes it, unless it’s an endpoint (first or last node), which is instead reset to its original coordinates (0,0 or 1,1) rather than deleted.
- Double-click: resets the curve, to the 3-node identity line (0,0 / 0.5,0.5 / 1,1) in scene modes, or to the camera’s default curve in Legacy mode.
The Scale for graph slider, below the graph, doesn’t change the image processing at all, it stretches the horizontal scale (linear to logarithmic) to make it easier to place a node precisely in the shadows or highlights, without having to zoom in.
Choosing the mode
The mode determines which tone-mapping engine applies after the base curve. Changing modes resets most sliders to their default values (except when switching directly between kinematic and dynamic, where settings are kept).
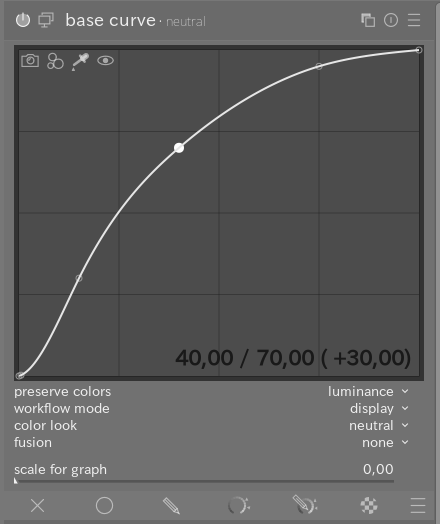
Legacy mode (display)
This is the module’s original mode, as it existed before the scene-referred extension. The curve applies directly to the RGB channels, without going through any intermediate color space, no JzAzBz, no Oklab.
By default it contains many nodes, often a curve specific to your camera, designed to mimic the manufacturer’s JPEG rendering rather than serve as a neutral starting point.
A complementary setting, Preserve colors, limits hue drift when pushing contrast with this curve.
All the saturation, gamut, and highlight sliders described below are hidden in the interface in Legacy mode, they don’t apply here, since there’s no scene tone mapping. The one exception: Color look and Look opacity remain available, even in Legacy.
This is the mode to use if you want the module’s historical behavior, without Libre DT-Lab’s scene extensions.
Scene mode
- Kinematic (ACES 1.0-inspired): follows the philosophy of the standard v1.0 RRT/ODT curve, with a progressive shoulder modulated by the perceptual luminance Jz. The default choice in scene mode, suited to most images.
- Dynamic (ACES 2.0-inspired): draws on v2.0’s work toward a softer shoulder and better hue preservation in highlights, through a gentler, more balanced tone curve. Preferable for very high dynamic range scenes or scenes with intense light sources in frame.
- Cinematic DRT: uses the same compression curve as Dynamic mode, but with an entirely different treatment in Oklab space (an OpenDRT-style vector norm). It includes a dedicated contrast control (Contrast) unavailable in the other two modes, and the Shadow correction slider is disabled by default here.
A Default workflow setting (in the module’s preferences) lets you choose which mode is used automatically on reset, independent of the mode currently active on the image.
Below is a description of the various sliders and settings available.
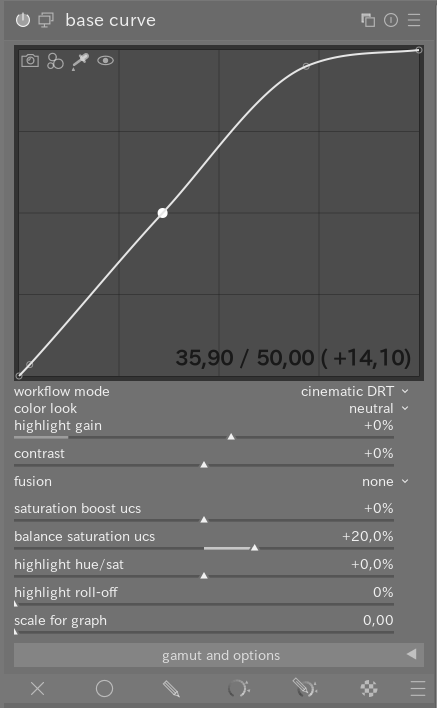
Highlight gain / Shadow correction / Contrast
These are the first three settings to adjust, before anything touching color, they shape the tonal range that the tone mapping will then compress.
Highlight gain (default 100%, range 25% – 175%): linear gain applied before tone mapping. To the right: more data is pushed into highlight compression. To the left: saturation is better preserved in light tones, at the cost of less-compressed highlights.
Shadow correction (default 100% in kinematic/dynamic, disabled by default in Cinematic DRT; range 25% – 175%): acts on shadow brightness before tone mapping. To the right: shadows are lightened. To the left: they’re darkened.
Contrast (Cinematic DRT only, default 0%, range −100% to +100%): contrast applied to “brilliance” in Oklab space, specific to this mode, doesn’t appear in kinematic/dynamic, which have no direct equivalent.
Saturation
Two distinct sliders, not to be confused: one sets a global level, the other redistributes saturation between shadows and highlights.
Saturation boost ucs (default 0%, range −100% to +100%): boosts or reduces saturation globally, within the UCS working space (JzAzBz in kinematic/dynamic, Oklab in Cinematic DRT). To the right: more vivid colors everywhere. To the left: a more desaturated image.
Balance saturation ucs (default 20%, range −75% to +75%): doesn’t change the global level, only the balance between shadows and highlights. To the right: shadows gain saturation, highlights are tempered. To the left: the opposite, highlights more saturated, shadows tempered. Useful for making dark colors pop without clipping specular highlights.
Color look and Look opacity
Color look (default neutral): a predefined color mood chosen from a list (11 presets: neutral, natural look, portrait, nature, vibrant, blue sky, soft warm, soft, deep cool, authentic cinema, bright atmosphere), applied as a 3×3 matrix before tone mapping. Each choice pushes the colors in a different direction, try them one after another to see what suits the image.
Look opacity (default 100%, range 0% – 100%): dials in the strength of the chosen preset. To the right: the preset applies fully. To the left: gradually returns to the neutral render. No visible effect if Color look is set to neutral.
Highlight hue/sat and Highlight roll-off
These two sliders handle what happens to colors when an area becomes very bright.
Highlight hue/sat (default 0%, range −100% to +100%): corrects hue and saturation drift specific to highlights (salmon sunsets, skies turning magenta). The mask activates progressively between Jz = 0.20 and Jz = 0.90. To the right: shift toward yellow/orange. To the left: shift toward blue/cyan. At 0: no correction.
Highlight roll-off (default 0%, range 0% – 100%): progressively desaturates highlights starting at 80% brightness, to avoid flat, saturated color patches at the clipping limit. At 0: no effect, highlights can clip with their original hue. To the right: they fade more cleanly to neutral before clipping.
Color space (luminance calculation)
Determines the coefficients used to calculate the luminance that tone mapping is based on, it does not affect gamut compression, which has its own sliders below. sRGB (Rec.709) uses standard, narrow-gamut coefficients; AdobeRGB medium-gamut coefficients; Rec.2020 (recommended for HDR/ACES workflows) covers the widest gamut.
Gamut and options
A collapsible section dedicated to managing out-of-gamut colors. Particularly useful in kinematic/dynamic (which work in JzAzBz); in Cinematic DRT, compression is already handled natively in Oklab, but these sliders remain active and can be combined with the internal treatment for a cumulative effect.
Compression smoothness (default 0%, range 0% – 100%): activates gamut compression and sets from what highlight level it kicks in. At 0: no compression, risk of clipping on very saturated colors. To the right: a more progressive, more “professional” roll-off on the most vivid colors, without affecting mid-tones.
Threshold cyan / magenta / yellow (default 15% each, range 0% – 100%): define the portion of the gamut protected from any compression, for each of the three channels. To the right: more colors are protected, but those that still exceed the limit may be poorly handled. To the left: compression kicks in earlier, on less extreme colors.
Limit cyan / magenta / yellow (default 20% / 30% / 20%, range 0% – 100%): the distance at which each channel’s compression saturates. To the right: stronger compression, more saturated but safer result. To the left: weaker compression.
Purity boost (default 0%, range −50% to +100%): revives color purity after gamut compression, while staying within allowed limits. Only has an effect if Compression smoothness is active. To the right: purer colors after compression. To the left: additional compression, more subdued colors.
Exposure fusion
In scene mode, exposure fusion isn’t true HDR fusion: it serves as radiometric normalization before tone mapping. Expose for the highlights before enabling it.
- Fusion: none, two, or three exposures to fuse.
- Exposure shift: how many stops separate each simulated exposure.
- Exposure bias: shifts the fusion toward preserving highlights (−1) or shadows (+1).
Suggested workflow
- Choose the mode (kinematic, dynamic, or cinematic DRT) based on the scene’s dynamic range.
- Fine-tune Highlight gain and Shadow correction first (Contrast instead of Shadow correction in Cinematic DRT).
- Set Saturation boost for the overall level, then Balance saturation if the shadows or highlights look dull relative to the rest.
- Apply a Color look if you’re after a particular mood, and dial it in with Look opacity.
- Only open the Gamut section as a last resort, if saturated color patches appear in the highlights.